I guess, of sorts. While the screwdriver was used to open that paint can, things really escalated when I wielded the brush (shown here subdued by a plastic bag). That circular might have been put to better use if actually read, as it was clearly no match for this event. I guess doing the bare minimum of prep work is where the reasons start for why you should do it yourself, right there at the very beginning. I can give you some tips on how to be an underachiever though that may inspire you to do a little paint makeover of your own though. Let's see how this project progressed.
Before:
Step one is apparently to not take a decent "before" picture. This prevents anyone from getting a real sense of how Another step not to be avoided is hastiness. Why empty the creepy, and possibly antique, doll in the drawer when she can provide company and moral support?
Be resourceful when making sensible choices for propping up your project. Old televisions and computer monitors make sturdy work stations if you happen to have some sitting around. Again, do not waste a lot of time or energy protecting the floor.
I also subscribe to the notion that paint equals primer, and eventually I will have enough coats.
After:
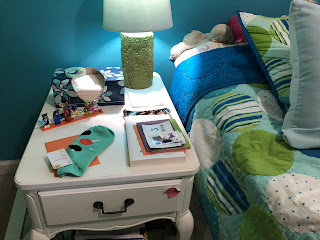
This is important - act quickly! Take that "after" photo before any bleed through occurs with your paint. Yes, there are absolutely ways to prevent this from happening, but need I remind you of the title of this post? This is about being good enough with your thrifty self when giving new life to a basement find.My daughter required more of an end table sized night stand, and she did not disappoint with how much stuff is typically spread out across the (poorly finished) top.
I can provide shortcuts and other half-assery tips for a multitude of undertakings - just ask!


